
Table of Contents

Introduction
Byldr is an application allowing Developers and users to develop an AR/VR application in AR/VR. With Byldr developers can quickly iterate and test without the long Build time with conventional means. It removes the massive learning curve and gives power to old and new developers to jump right in and start developing. Byldr also removes the need for a massive, complicated development environment that is mostly trial and error to get set up correctly. Byldr is compatible with Hololens 2 and Oculus Quest.
Byldr Alpha App Package Download Links
-
Byldr Alpha 01 for HoloLens 2 (ARM64):
-
Byldr Alpha 01 for Oculus Quest:
Before we get started, we will have to set up your devices for sideloading the app
1.1. Installing the app package to HoloLens 2:
Initial Setup: Enabling developer mode for the HoloLens 2
Before we install the app package for Byldr on the HoloLens 2. We have to make sure that developer mode is enabled for the Hololens 2. Developer mode is a requirement for installing custom packages on the HoloLens 2.
-
Power on your HoloLens 2 and put on the device.
-
Perform the start gesture to launch the main menu
-
Select the Settings tile on the menu.
-
Select the Update & Security menu item
-
Select For developers menu item on the left
-
Enable Developer Mode by selecting the toggle button
-
Enable Device Portal at the bottom
Setting up the HoloLens 2 web portal
Connect the HoloLens 2 to your computer with a USB cable then from the web browser on your PC go to https://127.0.0.1:10080. A setup access page should open. click on request pin and look at your Hololens display to see the generated pin
Enter the pin and your desired username and password

Click the Pair button to connect your HoloLens 2 to your PC
You should be in the device portals’ page

Expand the Views dropdown and select Apps
Under Deploy apps select Choose File

Select the appx file for the HoloLens 2 that you downloaded earlier. Click the Open button then press the Install button
Once it has finished installing the app will be accessible from All Apps on your HoloLens 2
1.2. Installing the app to Quest
We will install the app to the quest using SideQues
-
SideQuest is a program for Sideloading games or applications to the quest that are not available on the quest store.
Initial Setup: Getting your Quest and PC ready
There are a couple of things you’ll need to do with your Oculus account, your Quest, and your computer, to use SideQuest. This is all just a one-time setup action – you won’t need to do this every time you want to sideload something, only the first time.
Make sure you have a USB cord to connect your Quest to your computer.
The charging cord that ships with the Quest is the small reversible USB-C connector on both ends. USB-A uses the older standard USB port that you see in most computers from the last few decades. You may want a cord that has USB-A for your computer on one end, and USB-C for your Quest on the other. Unless, of course, your PC includes a USB-C port — then you should be able to use the included USB-C charging cord to connect to your PC. This included cord is USB 2.0, so if you have a lot of data to transfer you may want to get a cord with the increased bandwidth of USB 3.0
Register as a developer on the Oculus account associated with your Quest.
To use your Quest in Developer Mode (which is required for sideloading), you’ll need to register as a developer organization first.
-
Visit Oculus.com and make sure you’re logged into the same Oculus account that your Quest is registered to.
-
Enter a new organization name then read over the Oculus Terms of Service and tick the ‘I understand’ box to agree to them.
Enable Developer Mode on your Quest.
Now that you’re registered as a developer, you’ll be able to enable Developer Mode on your Quest. You can do this through the Oculus app, with the phone that is linked to your Oculus account/your Oculus Quest.
Open the Oculus app on your phone, with your Quest turned on so it can connect to the app, and then:
-
Tap the Settings button in the bottom right
-
Locate your Oculus Quest listed in the Settings tab, and make sure it reads ‘Connected. (If the app can’t connect to your Quest, you may need to tap on the Quest in settings to try and manually make the app connect. If it still can’t connect, make sure your Quest is turned on, and your phone has Bluetooth and WiFi turned on as well)
-
Tap the Arrow button next to your device, to reveal more options Tap the More Settings button
-
Tap on Developer Mode
-
Flick the switch to On instead of Off
-
Fully reboot your Quest – hold down the power button on the side until the Power off menu appears, then select Power Off. Your Quest should fully reboot to properly start in Developer Mode.
After rebooting, your Quest should be in Developer Mode.
Install SideQuest on your computer
Go to the SideQuest downloads page and download the install file for your operating system. Install the program like you would do with any other program for your operating system. SideQuest will also automatically install the drivers you need for your Quest to communicate with your computer, so there’s no need to worry about that, no matter which operating system you’re on (this used to be done manually, but now SideQuest takes care of it for you).
Allow USB debugging between your computer and your Quest
This should also be a one-time setup step if done properly.
-
Open SideQuest on your computer
-
Turn on your Quest and set up a guardian
-
Plug your Quest into your computer
-
Inside your Quest, not on your computer, you should see a request to Allow USB debugging.
-
If you don’t want to have to press OK on this screen every time you plug your Quest into your computer, make sure you check the Always allow from this computer box
-
Press OK
Congratulations! Your Quest and PC should now be set up to easily sideload apps via SideQuest.
SideLoading the to your quest to your Quest
The hard work is all done in the initial steps above. Once everything is set up, sideloading the app is very easy. With your Quest plugged into your computer and SideQuest open, double-check that SideQuest can connect to your Quest. If everything is okay,
-
The top right side of SideQuest will show a green dot with “connected” after the SideQuest version number. If SideQuest has a red dot and says ‘disconnect’, double-check that your Quest is on
-
Connected properly and you completed all the setup steps properly (especially the USB debugging permission steps). At this point all you need to do is click on the ‘install APK file from folder’ button, select the Byldr.apk on your machine, and click open.
-
To check the progress of installation or ensure that everything is installed correctly, you can click on the Tasks button on the top right and if the app was downloaded and installed correctly, you will see a bar reading “APK file installed ok!!”
2. Introduction to BYLDR’S Hall
2.1. Signing In
Before being able to explore Byldr you will need to set up a free account online. To create a free account:
Go to Byldr.app, then at the top right click the BYLDR’S HALL button to be redirected to the Byldr login screen. Click the Sign-Up button, then fill in the required information to make an account
-
You’ll use your new account credentials to log into Byldr on your headset.
2.2. Uploading Assets
We need to upload some assets to use in our next Byld. Here are some assets we have provided: (TODO: Replace assets)
Download the package and unzip the content into an appropriate folder
Now in the BYLDR’S Hall, in the top menu select the ASSETS tab.

Click on the Upload Files button

Click the Choose File button, navigate to the folder where you stored the supplied assets and select Rover.glb then wait for the model to load
Now set the position of the model for the thumbnail then upload
-
Left-click for rotation
-
Right-click for position
-
And scroll wheel for zoomAnd scroll wheel for zoom

Do this with all the remaining files

Congratulations you have successfully imported assets into Byldr
3. Using the app
3.1. Making a new Byld and Importing assets from the Byldr’s Hall
Locate and run the Byldr application on your device
-
For Quest, it will be located in the Unknown Sources section of your library

-
Note: if you don’t see the Unknown Sources option you will need to ensure developer options are enabled.
Locate and run the Byldr application on your device
After logging in you will be in the Byldr home screen, from here you can do the following
-
Add a new Byld
-
Test remote Byld
-
View Recent Bylds
-
View recent Collaborators
-
Sign out
Click on the ADD button, enter an appropriate name for your Byld - for example Getting Started, then click the CREATE button

Now you will see the environment options. For our purposes, we will select the top one but depending on what you are doing you might prefer a different environment.
Select the Empty Loft environment

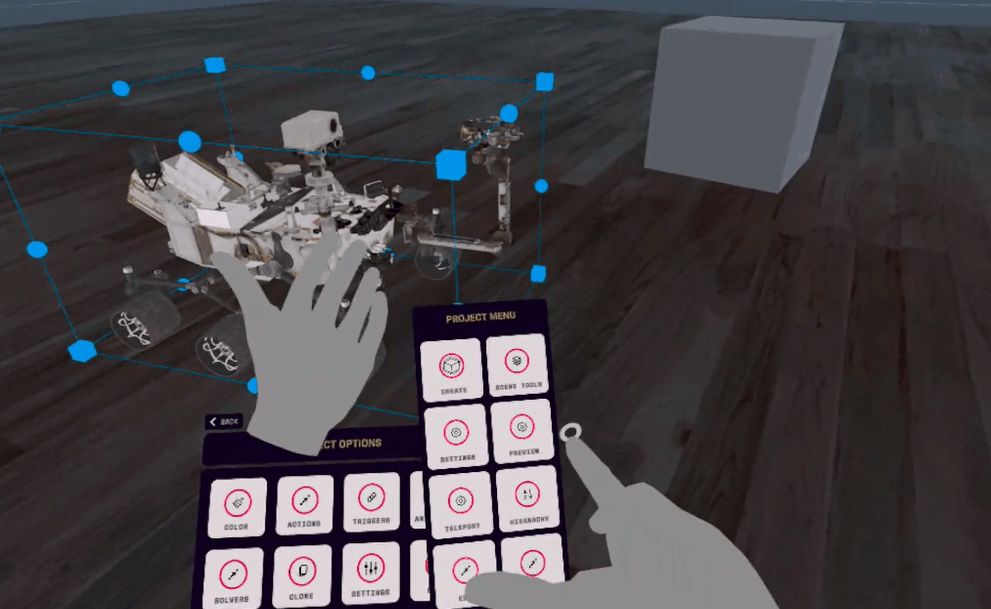
After loading into the Byldr environment open the PROJECT MENU by Lifting your left hand, palm up

Open the Import menu by pressing the CREATE button with your index finger, then in the CREATE menu select the IMPORT button

In the Import menu, Scroll down until you see the assets you uploaded to the Byldr’s Hall (The models with white background)

Click on the Rover to Import it into the Byld
-
You can position it where ever you like while it is still loading
Select one of the Blue Cubes at the corner to resize it

Congratulations! You have successfully imported an asset into Byldr
3.2. Using Actions and Triggers
Actions and Triggers are what Byldr uses to do most everything. Actions are things that you want to do, in this example, we will be taking the Hide and Show action. Tiggers are how, why, and when to call the action. In this example, we will use the Press Trigger. So when we press a button an object will appear or disappear
Select the Rover to open the OBJECT menu and click the ACTIONS button

With the Actions menu open, click the HIDE/SHOW button, then at the bottom under ENABLED ACTIONS slide the Enabled toggle to true

In the PROJECT menu, press the CREATE button to open the CREATE menu, then press the Cube button

Place the cube in front of you and resize it

With the CUBE selected, in the OBJECT menu, click the TRIGGERS button then select the PRESS trigger

Add the Byld Object with the action you want, then under AVAILABLE ACTIONS select the action you want, then slide the Enabled toggle to true

Open the PROJECT menu and press the PREVIEW button

In preview mode clicking on the cube toggles the visibility of the Rover
Congratulations! You have successfully hooked up an action with a trigger to hide and show an object that you uploaded.
.